TABLE OF CONTENTS
1.-- Initial Setup
- Charging The Battery
- Top Edge Of Unit
- Installation Begins
- Wallpaper (Screen Background)
- The Camera Icon On Cover Page
- Unlocking The Cover Page
- Setting Up Email
- Slippery Surface Of Unit
2.-- Home Page Screen
- Meaning Of Each Symbol On Home Screen
- Name Of Device: (Changing Device Name)
- Wi-Fi Emblem
- Battery Strength
- Time Of Day
- The "Search Box" On Home Screen
- The "Carousel": HOME / BOOKS & More
- Library: Apps That Are Downloaded
- Icons On Home Screen: Highways
3.-- The Home Page: Everything Begins Here
- The Non-Computer Generations
- Highways
- Home Is The Center Of Everything
- Practicing: Home Page To Each Icon
- Your First Shopping Trip
- Getting From Home To The Internet
- All Highways Start At Your Home Page
- Everything Begins / Ends At Home Page
4.-- Settings: 1
- Brightness Of Screen
- Adjusting Size Of Print
- Books
- Internet
- Emails
- Screen Rotation (Vertical / Horizontal)
5.-- Settings:2
- Notification Of Arriving Emails
- Books: Fonts, Screen Color, Margins,
Line Spacing
- Keyboards
6.-- Moving Icons / Setting Wallpaper
- To Move An Icon
- Creating A File Of Icons
- Warning About Removing Icons
- Wallpaper (Screen Background)
7.-- Email Contacts: Create A Contact
- From An Address Inside An Email
- Manually: From Email Address
(With No Email)
8.-- Email Contacts: Editing / Setting Favorites
- Edit A Contact
- Set A Contact As "Favorite"
9.-- Emails: Viewing, Replying To, And Forwarding
- The Inbox Screen
- Reply To An Email
- Forward An Email
- Refresh Inbox (Bring In New Emails)
10.-- Emails: Creating And Deleting
- Create An Email
- Delete Email You Are Viewing
- Delete Multiple Emails
- Delete Emails One At A Time From Inbox
11.-- Books
- Order Book From Amazon Shop
- Bookmarks
- Remove Book From Your Active Library
- Retrieve Book From Storage And
Return To Library
12.-- Internet
- Use Search To Get To A Web Site
- Bookmarks
- Create Multiple Tabs
(Switching Between Internet Sites)
- Setting The Default Search Engine
- Refreshing The Screen
(To See Current Information)
- Removing A Tab
13.-- Playing Internet Radio Through Kindle
- Public Radio Stations
- Loading The "TuneIn" App
- Bringing In Music After App Is Installed
- Browse: Selecting A Category
(Music & Talk)
14.--Amazon Prime: Music, Video, Books
- Introduction To Amazon Prime
15.-- Music: Categories (Amazon Prime)
- Recent Activities, Prime Music, Library
- Finding Main Menu
- To Get From Music Screen
Back To Main Menu
16.-- Music: Compositions (Amazon Prime)
- Downloading Music
- To Locate Downloaded Music
- Excellence Of Classical Music Selections
17.-- Music: Locations (Amazon Prime)
- Recent Activities Category
- Prime Music Category
- Library (Cloud Library) Category
- To Create A Playlist
18.-- TV Streaming
- Locating The Streamer
- To Obtain The App
19.-- Camera
- Taking Picture With Kindle Camera
- Using The Front-Facing Camera
- Camera Settings
- Viewing Photos
- Editing A Photo
- Email Photos
- Deleting Photos
20.-- Screen Print: Reproduction Of Kindle Screen
- Create A Screen Print
- Email A Screen Print
21.-- Microphone: Dictation On Kindle
- Practice Using The Microphone
22.-- Rebooting ... Correcting Problems
23.-- Removing Advertisements
24.-- Deregistering A Kindle
A Lighter Touch For Animal Lovers
Special Treats
More ...
Preface: Case Studies
This guide is written for people who have little or no experience operating a computer.
The goal is to provide a step by step plan for the reader to have success in operating a Kindle Fire (5th generation) and to experience the many joys and helps that come from this magnificent device.
One 77-year-old man was in our test group using this book to learn to use the Kindle. He is confined to wheelchair after a very serious heart operation. One hand ended up partially paralyzed and he reported he was having difficulty lifting his paper Bible. He had very limited experience with a computer. His wife reported the following: "John is very impressed. He can understand everything as we go along and the pictures of each step are a life saver. What a wonderful concept."
One of our test group is an 80-year-old woman who has many physical handicaps, walks with a walker, and her 94-year-old husband died about 2 weeks before she began trying to learn to use the Kindle. She took this book we wrote and used it to teach herself the basic principles. It provided valuable therapy for her in a serious time of adjustment. It helped occupy her mind and gave her a new mental project. One of our authors called her almost daily for the first month and coached her. The author lives in Colorado and this woman is life-long New Yorker (NYC). She is really doing well in using the Kindle. Can you image how much this can mean to her?
This is exactly why we compiled this material ... to help people, especially older people and physically handicapped people, who are confined to one physical space (wheelchair / bed). This gives each person an opportunity to get books and read books without going to library or book store. This device stores music, books, video in a unit which can be held in the hand and should be easily within reach of confined individuals. It helps each of us pass time and even enjoy time on this present earth in difficult periods of life. All we have to do is learn to use it. And we can!
CREATED BY:
Pam Padgett
Joan Boney
On Cover:
Building Blocks by
Kid Kraft
60 PC Wooden Block Set
(Order from Amazon)
Sample from Chapter 1 ...
1. Initial Setup
Charging The Battery
Remove battery cable from box.
Plug into top edge of Kindle and electrical
outlet on wall to fully charge the unit.
(Note: On top of one side of the plug that goes into
the Kindle, you will see a small design.
This is the up side of the plug.
You might put a white sticker on this side of plug to help you see up
side. You cannot reverse the
direction. Up is toward the face of the
screen when the cable is plugged into the battery charge outlet.)
When battery charge gets low, screen will look similar to following:
Short battery cord: The
battery recharge cord that comes with the Kindle is very short. What I
do is use an extension cord, putting the extension cord into wall
outlet and plugging the Kindle into the extension cord. This allows me
to use the Kindle from my recliner while the battery is recharging.
Top Edge Of Unit
To
turn the unit on/off: press/release
on the single silver bar on right top edge of Kindle.
When you plug in your Kindle for the first time and press the On/Off
button, you will see a message letting you know that your Kindle is
starting. After this the screen may be completely black for a few
seconds. Don't panic.
Before long installation
information will appear on screen. Installation
is very easy to do. Just follow the
directions as they appear on the screen.
There are several steps involved.
You will need to have the name of your wi-fi network and your wi-fi password in order to connect to the internet during installation.
You will also need to have your Amazon login and password so you can register your Kindle during the installation process.
During installation you will often see the word “installing” (or downloading) and a yellow line under that word will show you the progress of the installation and when it is finished the yellow line disappears and the next step will begin for the initiating of the start-up.
Sample
from Chapter 4 ...
4.
Settings: 1
There are multiple setting options on the Kindle and these make it easier for you, personally, to navigate about the Kindle. It is like arranging your own desk at home. You have preferences. This chapter is about preferences and giving you options which suit you better.
There are multiple setting options on the Kindle and these make it easier for you, personally, to navigate about the Kindle. It is like arranging your own desk at home. You have preferences. This chapter is about preferences and giving you options which suit you better.
Brightness Of Screen
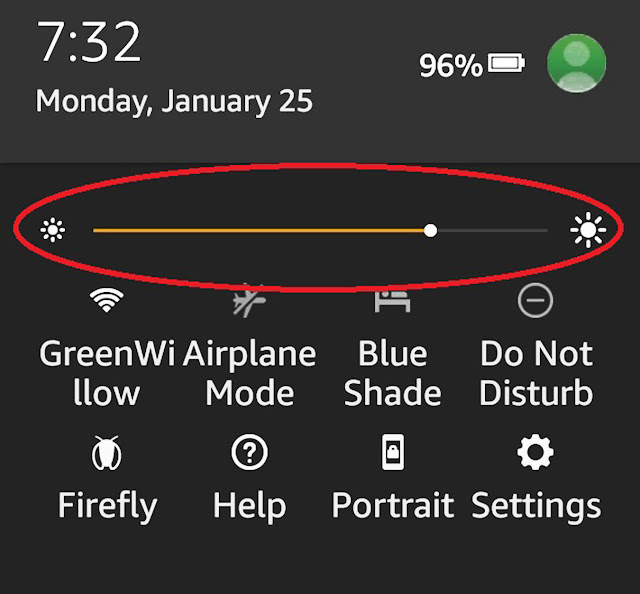
Press your finger on top of Kindle screen (at the right side of the name of the device) and drag finger down toward center of screen.
A menu will appear on top portion of screen. This is a very easy way to get to the place where you can adjust brightness of screen and you can do this from each location on Kindle: (from a book, from a web-site ...)
Press finger on the white ball on the screen and drag finger to the right to make the Kindle's backlight brighter.
Drag to the left to dim the backlight.
Return to the Home screen with one tap on the circle at the bottom of the screen.
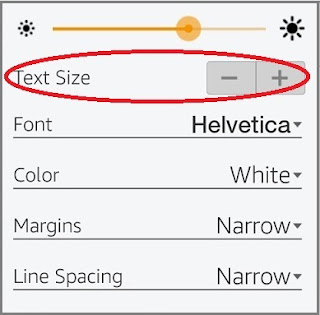
The following will appear on screen.
Print size increases or decreases each time you tap on the plus or minus.
When you have the size to your preference, it will remain that way on your book settings.
When you get to the web page you want to use, you can adjust the size of the print by putting two fingers (or thumb and index finger) on the screen, and dragging them apart while holding them down on the screen. You will see the size of the print enlarge as you separate your fingers and you will see the print on the screen decrease in size as you move fingers closer together. This is a very effective and instant method of changing the print size on the screen.
Internal setting to change print size for Internet
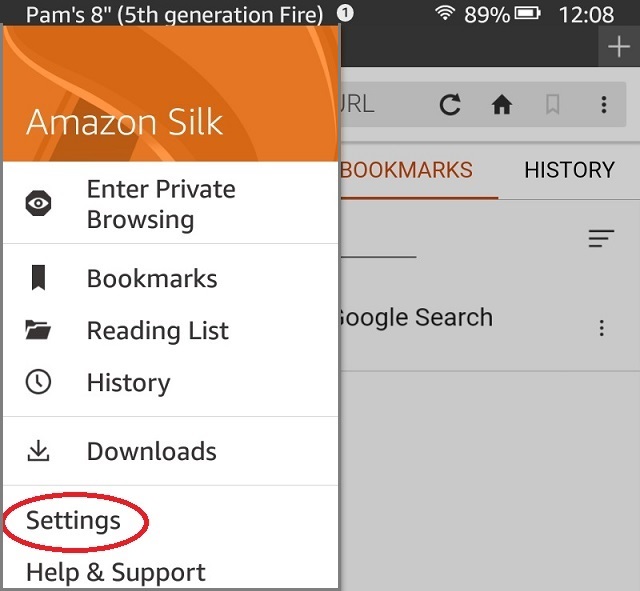
Tap on: 3 horizontal lines.
The Amazon Silk menu displays ...
Tap on: Settings
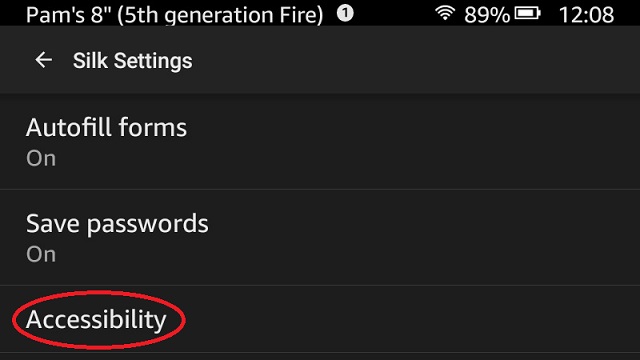
The following menu appears on screen ...
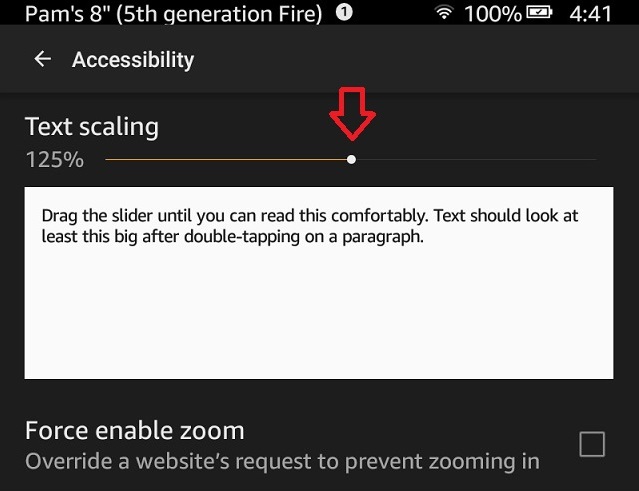
Tap on: Accessibility
The following appears ...
Place finger on the white ball and move to right to make larger or left to make print smaller. You will see the size of the print in the text below the white ball.
The Internet print will remain the size you choose.
Notice on the above screen: "Force enable zoom" (leave this unchecked) If the box has a check mark, tap and the check will go away.
You can then tap the triangle symbol at the bottom of the screen.
 Amazon customer review: March 10, 2016 - Very
well written and illustrated. Like very much the colorful
graphics and emojis. The extensive table of contents
is a plus in locating information. The page size and
print makes it easy to read. It is a delight to have
this manual.
 Amazon customer review: March 5, 2016 -I
received my full color paperback edition of this
Graphically Illustrated Kindle Fire 8 Guide yesterday and
it is wonderful!
 It has large print which makes it easy to read for people of any age. The instructions are simply written with large easy to understand graphics and emojis printed throughout the book which add a sense of fun to using this guide
Especially written for people born before computer age
and who may not be familiar with computers, at all.
Last chapter is devoted to pictures of animals which is
totally unexpected in a manual, such as this, but which
also makes it a fun book to use.
I doubt there could be an easier to use Kindle
Fire 8 Guide written than this one.
.
